New Library for Non-Deterministic Testing

I have currently been working on creating a system-level, feature test for some functionality that our company is developing to allow hospitals and health care providers to request a batch of eligibility requests for patients using a combination of Visual Studio 2012, SpecFlow 1.8 and FluentAssertions.  

In doing so, I ran into the problem of non-deterministic time.  Once a user uploads a file of requests, there is not a determined amount of time for that request to get a response from a third-party provider that we use to fulfill the request.  

So how do we handle the fact that we need to make some assertions at the end of the upload?  What would be nice would be to either retry assertions that fail or keep trying an assertion in the event of failure for a given timeout period.  In this case, we need to know that we can get a response within 30 seconds.

Enter James.Testing.  (Check it out when you get a chance.  You can download the dependency to your project from NuGet.org here.)

James.Testing is a library of test utilities named after the author who wrote the book of James in the Bible.
"Dear brothers and sisters, when troubles come your way, consider it an opportunity for great joy. For you know that when your faith is tested, your endurance has a chance to grow." (James 1:2-3)
It's a fairly apt description of what testing ought to do for our applications as well.
Below is a description of the supported features.

Action Extensions

Executing an Action with Retries

Many times in integration tests, there is a non-deterministic time period between executing some initial action and asserting your expectations for the outcome. In this case, it would be nice to have a method for automatically having the test retry your action for a number of times even though the assertion fails. This method also supports setting a wait time in between retries so that you don't overload your system.
Example:
var counter = 0;
Action action = () => counter++;
action.ExecuteWithRetries(times, waitTimeInSeconds);

Executing an Action with a Timeout Period

In other cases, you might want to execute a given action for a given time period. For instance, if you have a requirement to expect a response within 30 seconds, you can set the maximum timeout period to 30 seconds for your assertions. This method also allows a user to set a given wait time between executions of a given action.
Example:
var counter = 0;
Action action = () => counter++;
action.ExecuteWithTimeout(timeoutInSeconds, waitTimeInSeconds);

Investigating a Build Configuration Change in TeamCity


Our team is using TeamCity to run our continuous integration and nightly builds for our current project.  We discovered that in one of our build configurations, there was a build step that was no longer present, and we wanted to know who/what deleted it.

After looking online without success, I found that TeamCity actually provides auditing for these kinds of activities out of the box.  In order to find this information do the following:

1.  Click on the Administration link in the upper, right-hand corner of the TeamCity dashboard.  (Yes – this requires administrator privileges for at least the project.)

2.  Click on the Audit link under the Project-related Settings section in the left-hand side of the screen.  (Shown below)

image

3.  Select desired filters above the results list.  You can filter by action, build configuration, and user.

4.  In the list item in Step 2, you can actually click on the “view changes” link to see a comparison of the configurations in order to find out what has changed.  Below is an example of a build step being disabled.

image

Hope this help.

AgileDotNet 2012

My company, Improving, is hosting our third annual AgileDotNet conference in Dallas on Friday, February 17th. It will be a day of presentations and discussion focused on agile software development on the Microsoft stack, ALM tools, and the leadership and cultural issues involved in agile IT.  Hope you can  join us!

Full details can be found here.

Using Gists for Code Snippets

Normally, I use Windows LiveWriter to write my blogs at BlogSpot.  And I have always used syntax highlighter plug-ins to insert code snippets.  These utilities in the past inserted a lot of html elements and style definitions in-line with the rest of the post or required setting up global stylesheets and javascript in order to work.

In the last few weeks, as I have been looking at transitioning my blog to a ruby-based engine called OctoPress, I found another mechanism for inserting code snippets - gists from GitHub.  It allows you to store your code snippets online and easily add them to your posts with one line of code.

All you need to do is:

1.  Go to http://gists.github.com

2.  Sign up for  a free GitHub account

All you have to do is click on the link in the upper, right-hand corner "Sign up for a GitHub account".  It leads you through a process.


If you don't wish to create an account, you can create gists anonymously as well.

3.  Add gist to GitHub

All you need to do in order to add a new gist is: 

a.  Create a name for the gist
b.  Create a name for the file (this is optional)
c.  Select a language 

If you give the file a name, the system will determine what the language is from the extension.

d.  Put the text of the code snippet in the body of the gist
e.  Save the gist by clicking on the Save Gist button.


4.  Add the gist in your post

In order to add the gist to your post, you will need to click on the show embed link and add the html snippet to the html content of your post.  In this case, 

<script src="https://gist.github.com/1522062.js"> </script>

Once you have added this, the code should appear in the post as below.


5.  Add line numbers via additional css styles

You may notice once using the steps above that the native gists from GitHub do not support line numbers currently, so in order to add them I found a gist that contains the .css styles that you need to add to your blog site.  Once added, all snippets appear with line numbers as you saw in point number 4. 


If you find another way to do this by adjusting settings at GitHub, let me know in the comments.

Hope this helps!

Creating Data-Driven Tests in MS Test

For my current client, I was looking for a way to create a data-driven unit test in MSTest.  Basically, you can define a test once and then define a data source that provides multiple rows of data to be sent through the same test.  That way, you don’t have to write redundant tests.
I had done this previously, but I couldn’t remember how it was done.  I’m writing this post in order to remind myself and hopefully help someone out there.
1.  Create a Test Method
The first step is to make sure you have a test method.  You can do this by making sure that in your test project you have at least one class decorated with the [TestClass] attribute and a method with the [TestMethod] attribute. 
[TestMethod]
public void Add_when_two_numbers_returns_proper_result()
{
}


When creating this test class, make sure to keep the TestContext property as it is defaulted.  You will be using this when coding your test.


private TestContext _testContext;
 
/// <summary>
///Gets or sets the test context which provides
///information about and functionality for the current test run.
///</summary>
public TestContext TestContext
{
get
{
return _testContext;
}
set
{
_testContext = value;
}
}


2.  Add a Test Data File

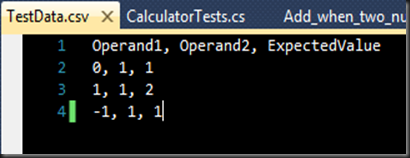
For the purposes of this explanation we will be using a simple .csv file (TestData.csv).  Make sure to add a text file, preferably at the root of your project with that extension.  In the file, you will want to add data.  I have added three columns per row:  Operand1, Operand2, and ExpectedValue which represents the expected result of adding the two operands together.  You can add as many rows of data to check all of the boundary conditions that express your intentions for your unit test.
image

Right-click on the file and select Properties to set the Build Action to Content and the Copy to Output Directory to Copy Always as shown below.  This will ensure that the file is copied to the Bin folder when running your unit tests.

image

3.  Open the Test View from the Test menu.

From the Test menu, select the Windows –> Test View option as shown below.

image

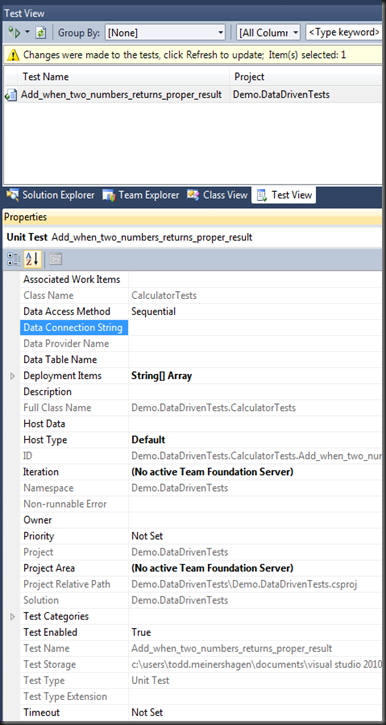
Once you open the Test View, you should see a list of the test methods that are available.  When a test is highlighted, you will see the properties for that particular test in the Properties pane as shown below. 
image

4.  Assign Test File as Test Data Source

Find the row for Data Connection String in the Properties pane and click on the button to the far right with the ellipses (…).  That should open the following dialog where you will be presented with an option to set up a database, csv file, or xml file.

image

The database option should be self explanatory.  It is like any other database connection, and the most popular option is to use a simple MS Access DB or SQL Express database that you can include with your project.

The other two options are file based.  The CSV file will be explained in further detail below.  The main difference between a CSV and XML file is that you can have multiple test data sets in the XML file while only one set of data would be accessible for a CSV.  So, if you need to set up data for multiple tests, you would need to maintain multiple files with the CSV option.  In the XML option, you could just maintain one with multiple sections within the XML file.

Select the CSV File option and click Next.

5.  Select Your CSV File

At this point, you will be presented with a dialog to select a CSV file.  Click on the (…) button and select the location of the text file that you created for your test.

image

Once selected, the dialog will show the contents of your CSV file as a data grid to allow you to examine the contents to make sure that the data is what you were expecting.

image


Click the Finish button once you have confirmed the file contents.  You will notice that the properties have been updated to reflect the change.

image

In addition, Visual Studio will add a [DataSource] and [DeploymentItem] attributes to your original test method as shown below with the same information.  In the future, you can set these attributes up on a test without needing to use the Properties wizard for selecting a Data Source.

[DataSource("Microsoft.VisualStudio.TestTools.DataSource.CSV", "|DataDirectory|\\TestData.csv", "TestData#csv", DataAccessMethod.Sequential), DeploymentItem("Demo.DataDrivenTests\\TestData.csv"), DeploymentItem("TestData.csv"), TestMethod]
public void Add_when_two_numbers_returns_proper_result()
{
}


6.  Add Code to Reference Data Source

Once you have added your test data to the test method, you will want to access it within the body of your unit test method.  This can be done by referencing the DataRow property of the TestContext class-level variable.  I have created a simple test to use the values to assert that the Add method of a simple Calculator class works as shown below.  Because a DataRow column returns an object, you will need to do some casting to the appropriate data types.

[DeploymentItem("Demo.DataDrivenTests\\TestData.csv"), DeploymentItem("TestData.csv"), DataSource("Microsoft.VisualStudio.TestTools.DataSource.CSV", "|DataDirectory|\\TestData.csv", "TestData#csv", DataAccessMethod.Sequential), TestMethod]
public void Add_when_two_numbers_returns_proper_result()
{
//arrange
var operand1 = System.Convert.ToInt32(TestContext.DataRow["Operand1"]);
var operand2 = System.Convert.ToInt32(TestContext.DataRow["Operand2"]);
var sut = new Calculator();
 
//act
var result = sut.Add(operand1, operand2);
 
//assert
var expectedValue = System.Convert.ToInt32(TestContext.DataRow["ExpectedValue"]);
Assert.AreEqual(expectedValue, result);
}


7.  Run the Test

You can run the test as you would any other in MS Test.  The result will look similar to other tests.

image

However, if you right-click on the result row in the Test Results pane, and select View Test Results Details as shown below…

image


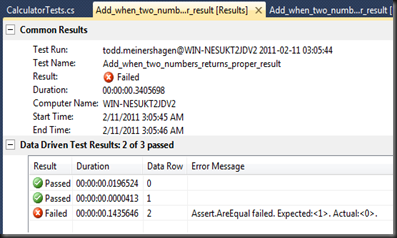
…you will see the detail of the results to see which data combinations failed and why.
image

Hope this helps someone else out there.